Month: August 2024

  • Guide to Thoroughly Uninstalling Anaconda on Mac: A Concise Overview

    Guide to Thoroughly Uninstalling Anaconda on Mac: A Concise Overview

    Explore methods to uninstall Anaconda from your Mac effortlessly! Discover effective ways to remove Anaconda from your Mac system in this comprehensive guide. Uninstalling Anaconda may seem challenging, but we’re here to simplify the process for you. Follow our step-by-step instructions to seamlessly eliminate Anaconda and its remnants from your internal drive.

    How to Completely Uninstall Anaconda on Mac: Quick Guide

    Optimal Method to Uninstall Anaconda from Mac Systems: Simplified Approach

    Removing Anaconda is a breeze with the right tool. BuhoCleaner is your solution. With just a few clicks, it effortlessly deletes the Anaconda app and its files. If you’re new to Mac, BuhoCleaner is the top pick for Anaconda removal.

    Here’s how to uninstall Anaconda with BuhoCleaner:

    1. Download, install, and launch BuhoCleaner.
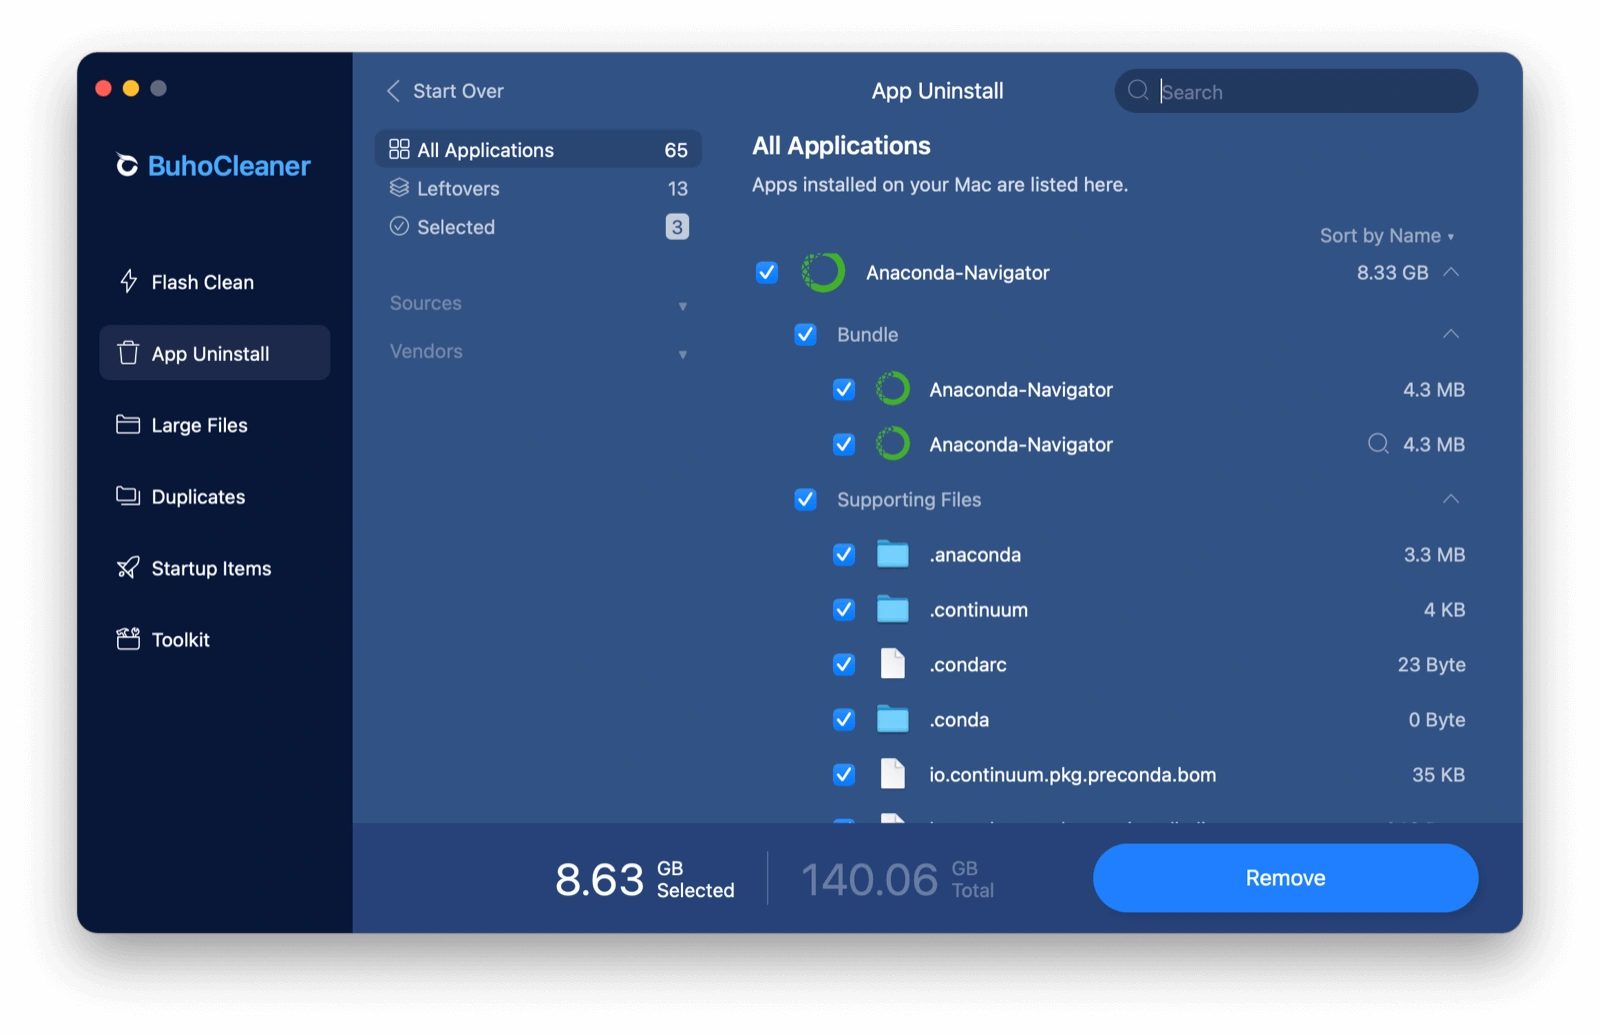
    2. Click “App Uninstall” in the sidebar and you will find all apps installed on your Mac.
    3. Find Anaconda in the results list, check it, and click the “Remove” button.
    4. Uninstall Anaconda with BuhoCleaner
    5. If you still find the Anaconda icon in the Applications folder, drag it to the Trash.
    6. If you have previously deleted Anaconda but are not sure if its residual files have been removed, switch to “Leftovers” to quickly detect and remove them.

    How to Manually Uninstall Anaconda on Mac with Terminal

    According to the official, you have two options to uninstall Anaconda on your Mac. One is simple removal, and the other is complete removal. The former will delete the entire Anaconda directory only, while the latter will completely uninstall Anaconda and all its related files.

    How to Do a Simple Remove:

    1. Open Terminal.
    2. Type and execute the command: cd ~ ; rm -rf anaconda3 to remove the entire anaconda directory.
    3. Depending on your installation, your anaconda2 or anaconda3 directory will be in your root or opt folder. And the command you should use is cd ~ ; rm -rf anaconda2 or cd ~ ; rm -rf opt/anaconda3.
    4. The rm -rf command is dangerous. Please use it with care.

    How to Do a Full Remove:

    1. Open Terminal.
    2. Type in the command: conda install anaconda-clean and press the Return key to install the Anaconda-Clean package.
    3.  Then enter and run one of the following commands to remove Anaconda-related files and directories.
    • anaconda-clean 
    • anaconda-clean –yes
    1. Type and run the command: cd ~ ; rm -rf anaconda3.
    2. The last step is to remove the backups of Anaconda-Clean. Just run the command below into Terminal: cd ~ ; rm -rf .anaconda_backup.

    How to Manually Uninstall Anaconda on Mac with Finder

    1. Open Activity Monitor and quit all the processes of Anaconda.
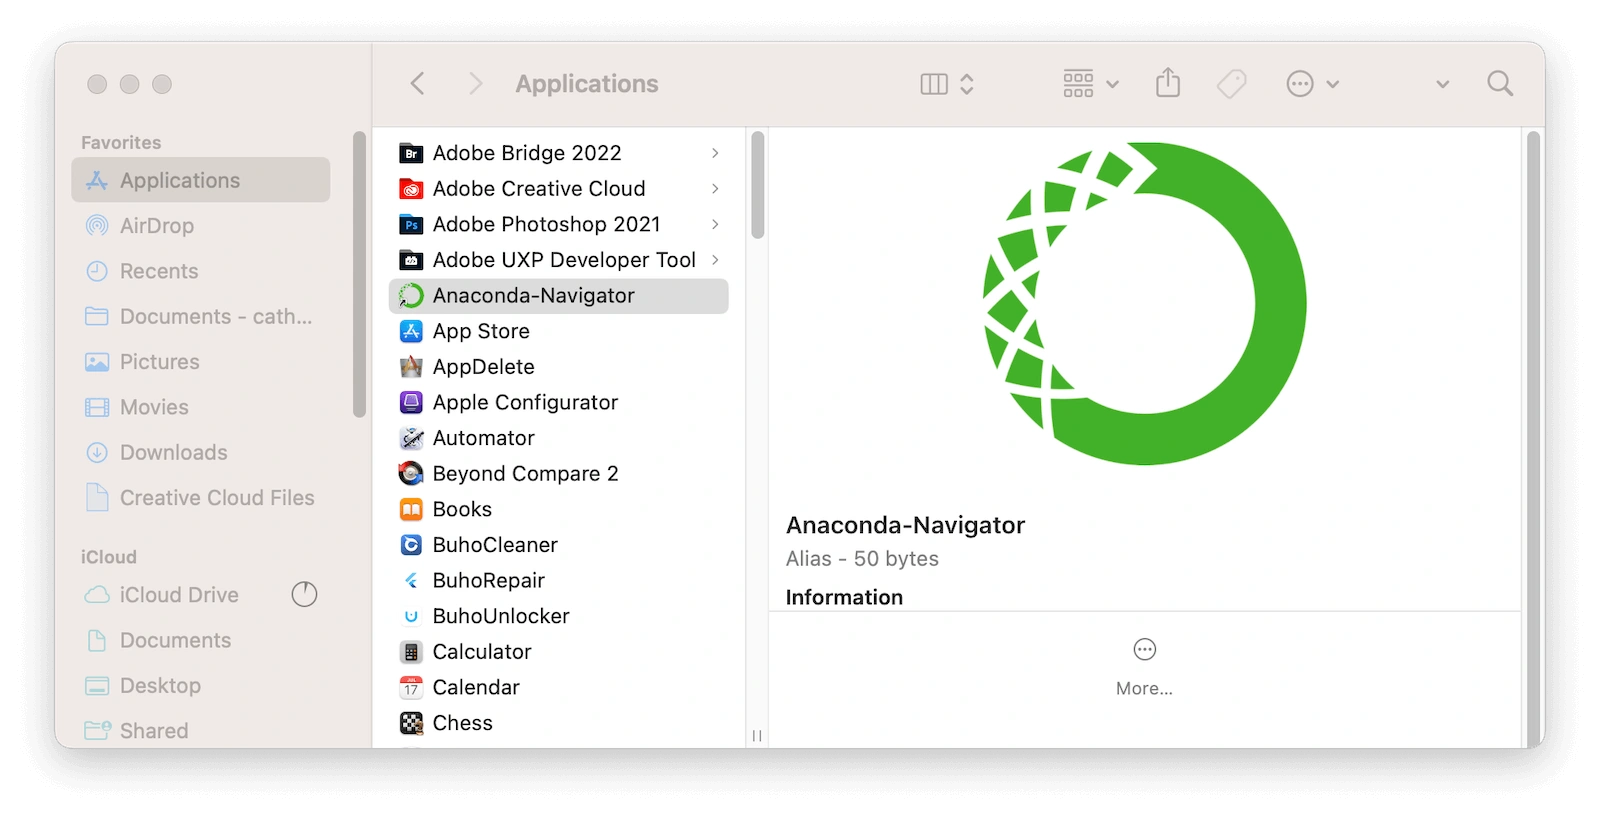
    2. Open Finder and find Anaconda in Applications.
    3. Right-click on the Anaconda icon, select “Show Original”, and drag “Anaconda Navigator” to the trash.
    4. In the Applications folder, find the Anaconda Navigator icon and drag it to the trash.
    5. Manually Uninstall Anaconda on Mac Using Finder
    6. Click the “Go” menu in Finder and choose “Go to Folder”.
    7. Type the following paths to find and delete all files related to Anaconda.
    • ~/Library/Receipts/io.continuum.pkg.anaconda-client.bom
    • ~/Library/Receipts/io.continuum.pkg.anaconda-client.plist
    • ~/Library/Receipts/io.continuum.pkg.anaconda-navigator.bom
    • ~/Library/Receipts/io.continuum.pkg.anaconda-navigator.plist
    • ~/Library/Receipts/io.continuum.pkg.anaconda-project.bom
    • ~/Library/Receipts/io.continuum.pkg.anaconda-project.plist
    • ~/Library/Receipts/io.continuum.pkg.anaconda.bom
    • ~/Library/Receipts/io.continuum.pkg.anaconda.plist 
    1. Even if you have completed the above steps, there is no guarantee that all relevant files will be deleted. You’d better check the following folders to remove all the Anaconda-associated files.
    • ~/Library/Containers/
    • ~/Library/Application Support/
    • ~/Library/Logs/
    • ~/Library/Application Scripts/
    • ~/Library/Caches/
    • ~/Library/Preferences/
    1. Empty your Trash.

    Bonus Tip: How to Remove Anaconda PATH from .bash_profile

    Upon uninstalling Anaconda and its associated files, consider removing its path from the .bash-profile as well. Here are the necessary steps to follow:

    1. Open Terminal from Spotlight or Launchpad.
    2. Type and run the command: cd ~.
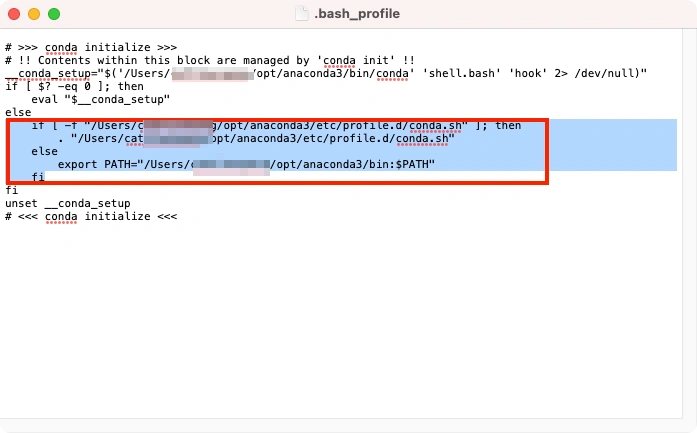
    3. Type and execute the command: open .bash_profile.
    4. Delete the contents of the red box in the image, and then save the file.
    Remove Anaconda PATH
    1. Back to the Terminal, type and run the command: source ~/.bash_profile.

    Conclusion

    Uninstalling Anaconda with BuhoCleaner is a breeze. Say goodbye to the hassle of commands and files – let BuhoCleaner handle it all effortlessly. Plus, BuhoCleaner offers a range of handy tools like junk cleaner, duplicate file finder, large file finder, and startup program manager. Experience the convenience today!

  • Resolving the Challenge of Inability to Copy or Write Files to NTFS Drives on Mac – 6 Helpful Tips

    Resolving the Challenge of Inability to Copy or Write Files to NTFS Drives on Mac – 6 Helpful Tips

    Summary: This post provides six effective solutions to assist you in resolving the issue of being unable to copy or write files to NTFS drives from a Mac system. By following these recommendations, you can overcome the challenges associated with this particular scenario and enhance your overall user experience.

    • Why is my Mac unable to copy to NTFS?
    • How to copy files from Mac to NTFS drive?
    • How do I make my NTFS drive writable on a Mac?
    • Why can’t I paste to NTFS from Mac?

    If you have similar problems, you can check the 6 tips below to fix can’t copy or write to NTFS drive on Mac.

    can’t write to NTFS drive on Mac

    Fix 1. Use an NTFS for Mac Application

    NTFS serves as Windows’ primary file system, developed by Microsoft. While effortlessly connecting and utilizing an NTFS drive on your Windows PC is a breeze, the situation shifts when pairing it with a Mac. Mac’s support for NTFS drives is limited; they are essentially read-only on Mac systems. To bridge this gap and enable bidirectional file transfers between Mac and external NTFS drives, consider installing an NTFS for Mac software tool. BuhoNTFS, a user-friendly and free NTFS for Mac application, facilitates seamless reading and writing operations on NTFS drives within Mac environments.

    1. Download and install BuhoNTFS from its official website.
    2. Connect the NTFS drive to your Mac computer.
    3. Launch BuhoNTFS. Select the NTFS drive from the left panel. Tick “Allow Read & Write permission”.
    4. Then you can click Open to open the NTFS drive to easily copy files between your Mac and the NTFS drive. You can also add, delete, rename, read, and write files on the NTFS drive.
    BuhoNTFS

    Fix 2. Check the Hardware Connections

    To enhance the writing quality and readability while maintaining the original meaning, the revised content is as follows:

    Consider using a USB-C to USB adapter to connect the NTFS drive to your Mac. Attempt switching to a different USB port for a potential solution. Alternatively, try connecting the adapter to another Mac computer to test its functionality. If the issue persists with file copying/writing to NTFS from Mac, experiment with a different USB-C to USB adapter. Remember to restart your Mac and ensure the NTFS drive is securely connected.

    Fix 3. Enable writing on an NTFS Drive on Mac using Terminal.

    You can also use Mac Terminal to enable the write support or NTFS drives on your Mac. But this way is not recommended by Apple since it may cause disk corruption.

    1. Connect the NTFS drive to your Mac computer.
    2. Click the Spotlight Search icon at the top-right, type terminal in the search box, and choose the Terminal app to open it.
    3. Type the command sudo nano /etc/fstab in the Terminal window and press the Return key.
    4. Type the command LABEL=NAME none ntfs rw, auto, nobrowse at the end of the list. Replace “NAME” in the command with the name of the external NTFS drive. Press Return.
    5. Then open Finder and click Go > Go to Folder, type /volumes, and find the target NTFS drive to open it. You can smoothly copy and paste files from Mac to NTFS or vice versa. You can also create and edit files on the NTFS drive from your Mac.

    Fix 4. Convert NTFS to FAT with a Disk Partition Manager

    To resolve the inability to copy or write files to an NTFS drive from a Mac, consider utilizing a reputable Disk Partition Manager tool to convert NTFS to exFAT or FAT32 seamlessly without data loss. Various tools are available online for this purpose. It’s noteworthy that Mac systems offer full support for drives formatted in exFAT and FAT32.

    Fix 5. The NTFS Drive May Be Corrupted

    1. Click the Spotlight Search icon, type disk utility, and select Disk Utility to open Mac Disk Utility.
    2. Select the target NTFS drive from the left panel.
    3. Click the First Aid button and click Run to check and repair the corrupted disk.
    repair corrupted hard dive

    Fix 6. Reformat the NTFS Drive to exFAT or FAT32

    If you’re unable to transfer files to an NTFS drive from your Mac, consider reformatting the NTFS drive to exFAT or FAT32, both of which are fully compatible with Mac systems. Remember to back up all necessary data from the NTFS drive to another device before proceeding with the formatting.

    1. Follow the same operative above to open Disk Utility on Mac.
    2. Select the external NTFS drive and click Erase.
    3. Enter a name for the drive and choose exFAT or FAT32 to format the drive to FAT32 or exFAT.
    format NTFS drive to exFAT

    In summary, this post offers 6 tips to troubleshoot issues when unable to copy or write files to an NTFS drive on your Mac. I trust these suggestions prove beneficial.